
12 IKEA Billy Bookcase Built-In Ideas for Apartment Renters
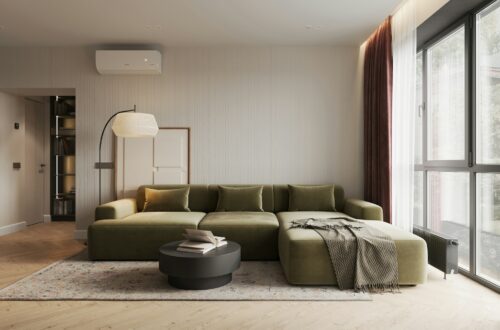
A single IKEA Billy bookcase costs $69. Line up three of them against a wall, cap the top with crown molding, and paint everything the same color as the drywall, and the result looks like custom built-in shelving worth $2,500. That is the whole secret behind this popular renter hack, and once you see it done correctly, you cannot stop noticing it everywhere. These 12 IKEA hacks for the Billy bookcase built-in transformation cover every step, from the first unit placement to the final shelf styling, so your apartment looks like it came with architectural shelving from the day it was built.
Why the Billy Bookcase Is the Best IKEA Hack for Built-In Shelving

Billy bookcases have been produced to nearly identical specifications for decades. The standard white finish matches most rental-white walls closely enough that a single coat of matching paint makes the units blend directly into the background. They come in two heights (79 inches and 93 inches with the height extension add-on) and two widths (15.75 inches and 31.5 inches), which means you can mix combinations to fit almost any wall. The adjustable shelves let you customize the interior layout without cutting anything. No other bookcase at this price point gives you this much dimensional flexibility, and no other piece of IKEA furniture has the same depth of community hacks, sourced trim pieces, and online tutorials built around it.
The Billy also has a solid back panel, which matters more than most people realize. That back panel is what gives the finished unit a recessed, cabinet-like appearance rather than the open-backed look of floating shelves. When you paint the back panel the same color as the wall, the shelves appear to float in front of a deep recess rather than sitting on the surface of the room. That is the visual trick at the heart of every successful Billy built-in.
- Standard Billy: $69 at IKEA in white, birch veneer, and black-brown
- Height extension unit: $20, fits on top of the 79-inch unit
- Oxberg glass-front door: $30 per pair, adds closed storage
- Total for a 3-unit wall: approximately $250 before paint and trim
Ideas 1 and 2: Go Floor to Ceiling and Align Multiple Units Wall to Wall

The single most important thing you can do to make a Billy bookcase look built-in is close the gap between the top of the unit and the ceiling. A bookcase that floats two inches below the ceiling will always look like furniture. A bookcase that meets the ceiling looks like architecture.
IKEA sells the Billy height extension unit for $20. It stacks directly on top of the standard 79-inch unit and brings the combined height to just under 93 inches. In apartments with standard 8-foot (96-inch) ceilings, that leaves a 3-inch gap. Cut a 1×4 pine board to the width of the bookcase, nail it flush against the top of the extension unit, and caulk the joint where the board meets the ceiling. Sand, prime, and paint. The gap disappears. For apartments with 9-foot ceilings, build a custom filler strip from MDF or pine and attach it above the extension using construction adhesive and small brad nails.

A single Billy bookcase looks like a Billy bookcase. Three or four placed side by side with their edges touching look like a built-in wall unit. The trick is making the seam between adjacent units invisible. Drive a few screws through the side panel of one unit into the side panel of the next to prevent them from drifting apart. Then apply a thin bead of paintable caulk in the vertical seam between units and paint over it. Once dry, the two separate pieces read as one continuous structure.
Before moving anything into place, measure your wall and plan the layout on paper. Mark stud locations with a stud finder so you know exactly where to drive wall anchors. Shim the units level from the floor before anchoring anything. Level matters more than plumb here because a shelf that tilts even half an inch to one side will show every book on it. Once all units are level and in final position, anchor each one to a wall stud through the back panel using the hardware IKEA includes.
Idea 3: Add Crown Molding for an Instant Custom Built-In Look (IKEA Hacks Billy Bookcase Built In)

Crown molding is the single highest-impact upgrade for a Billy built-in. Without it, the flat top edge of the unit signals IKEA furniture. With a continuous run of crown molding across the top of all units, connecting to the wall on both sides, the whole structure reads as architecture. The molding draws the eye upward and suggests that the shelving grew out of the room rather than being placed in front of it.
You do not need carpentry experience to install it. Choose a simple profile such as a clamshell or a basic ogee from the lumber section at Home Depot or Lowe’s. These run about $1.50 to $2.50 per linear foot. Cut the ends at 45 degrees where the molding meets the wall, which any standard miter box can do. Nail the molding to the top front edge of the Billy units using a finish nailer or small finish nails, then caulk every joint and paint. The whole process takes one afternoon.
For renters: use construction adhesive and small brad nails rather than large screws. The molding comes off cleanly with a utility knife when you move, and the small holes fill with spackling paste in minutes. Most move-out inspections will accept this type of repair without deduction.
Idea 4: Paint the Bookcase and Wall the Same Color

This one change transforms a good Billy installation into a great one. When the wall, the visible sides of the units, and the back panels are all the same color, the bookcases stop reading as objects placed in front of a wall and start reading as part of the wall itself. The furniture disappears. Books and objects become the visual focus rather than the shelving that holds them.
Paint the wall first, before moving the units into place. Use a satin or eggshell finish because you will be touching this surface constantly when pulling books and the finish needs to hold up to cleaning. Then paint the sides of each bookcase unit and the back panels before assembling them in place. After everything is anchored, do a final touch-up coat on the seams between adjacent units and any spots where you patched the crown molding joints.
The classic choice is a warm white that matches the rental ceiling. This produces the most seamless built-in effect. But the same principle works with any color. Deep navy, forest green, warm charcoal, and terracotta all read as intentional design when every surface in the installation shares the same shade. If you cannot paint the walls in your rental, apply this treatment only to the bookcase surfaces. Even painting the back panels and side panels alone, while leaving the rental white walls untouched, creates a dramatically more polished result than factory white particleboard against a white wall.
Ideas 5 and 6: Build a Base Plinth and Add LED Strip Lighting

A Billy bookcase sitting directly on the floor looks like a piece of furniture. A Billy bookcase elevated on a plinth base looks like a built-in cabinet. A plinth is a simple rectangular platform, usually 3 to 5 inches tall, that all the units rest on. It hides any variation in floor level and creates the base detail you see at the bottom of custom millwork in renovated apartments.
Build one from three or four pieces of 2×4 lumber arranged horizontally every 16 inches across the length of your planned unit run. Attach a face board of 1×4 lumber along the front edge, paint it the same color as the units, and set the bookcases on top. Materials cost $20 to $40 depending on how wide your installation runs. This step is optional but adds significant visual polish for minimal effort.
LED strip lighting (Idea 6) is the other finishing detail that makes a Billy built-in look intentional. Run a self-adhesive LED strip along the underside of each shelf before placing books. Warm white strips at 2700K color temperature cost $15 to $25 for a 16-foot roll and are widely available online. Tuck the power cord along the back of the unit and plug into a power strip hidden inside one of the lower closed-storage sections. The strips cast a warm glow on the books and objects below each shelf, adding the kind of ambient light that makes a room feel designed rather than decorated.
Ideas 7 and 8: Add Doors and Use Billy as a Room Divider

Adding doors to the bottom third of your Billy wall is one of the most practical upgrades available. The lower section becomes closed storage for anything you want to hide: extra bedding, board games, cables, cleaning supplies, or kitchen overflow. The upper shelves stay open for books and display pieces. The combination of open upper storage and closed lower storage is exactly what you see in custom built-in designs, and it significantly increases the practical usefulness of the wall beyond a simple bookcase.
IKEA sells Billy doors in white and glass-front styles. The Morliden glass-front door ($30 per pair) works particularly well because the textured glass obscures what is behind it while still looking considered. The doors attach using the included hinges, and the installation is fully reversible.
For studio apartment renters (Idea 8), position a row of Billy units perpendicular to the longer wall to divide sleeping from living areas. The back panel of the Billy means that both sides of the divider get a finished, usable surface rather than an exposed back panel. Load books on the living-room side and use the bedroom side for a bedside reading collection. Add a small lamp on top and the divider becomes a functional piece of furniture that creates genuine room separation without a single wall being built.
Ideas 9 through 12: The Finishing Details That Elevate the Whole Look

Idea 9: Side panel molding. If your bookcase run does not extend wall to wall and you have a visible end panel, apply picture-frame molding in a rectangle across the outer side face. Paint it with the rest of the unit and the exposed side becomes an architectural panel detail rather than a flat IKEA surface. A $10 length of molding from the lumber aisle is all you need.
Idea 10: Paneled back detail. Instead of a solid painted back panel, glue thin strips of MDF in a grid pattern to the back of each unit before painting. This creates a raised panel look inside each cubby that reads as a high-end millwork detail. Cut the strips to simple rectangles, glue them in place, fill the seams with caulk, and paint. Total material cost per unit: about $8.
Idea 11: Removable wallpaper on the back panel. For renters who want pattern instead of solid color, apply peel-and-stick wallpaper to the inside back of the bookcase before installing. Choose a botanical print, a geometric tile, or a textured linen pattern. The wallpaper is fully removable when you move. The patterned back panel turns each shelf into a framed vignette and adds tremendous visual interest to the room.
Idea 12: Decorative shelf edge banding. Iron-on edge banding with an ogee or scalloped profile adds a furniture-maker’s detail to the front edge of each adjustable shelf. Apply it with a household iron, trim to length with scissors, and press the edges with a block. The result is a shelf front that looks like it came from a custom joinery workshop rather than a flat-pack box. A roll of decorative banding costs about $12 and covers multiple shelves.
How to Style Your Billy Bookcase Built-In Like a Design Pro
Installation is half the project. Styling is what makes a built-in feel like a curated feature rather than organized storage. Three rules cover most of it.
- The 60/30/10 rule: fill 60 percent of each shelf with books, 30 percent with objects and plants, and leave 10 percent open. The empty space is part of the design. It gives the eye somewhere to rest and makes the entire wall look considered rather than stuffed.
- Vary the arrangement: alternate between books standing vertically and books stacked horizontally in small piles of two or three. This breaks up the monotony of a wall of uniform spines and creates visual rhythm across the whole installation.
- Add one trailing plant: a pothos or an ivy placed on an upper shelf adds organic contrast to the geometric grid of the shelves. The trailing foliage draws the eye upward and softens the hard angles of the unit. One plant is enough; three becomes a jungle.
Group small objects in odd numbers. Pairs feel symmetrical and formal. Groups of three or five feel personal and collected. Stack two or three art books horizontally and place a single small object on top of the stack to create the kind of layered shelf vignette that looks effortless but is easy to replicate shelf by shelf.
Renter-Friendly Tips Before You Buy Your First Unit
Three things to confirm before purchasing.
First, measure your ceiling height. A standard 79-inch Billy plus the $20 extension unit reaches about 93 inches. In an 8-foot ceiling that leaves a 3-inch gap. In a 9-foot ceiling the gap is about 15 inches. Both are closeable with trim, but the larger gap needs a more substantial filler board. Plan this before you buy.
Second, anchor to studs. A fully loaded bookcase is heavy. The wall anchor IKEA includes in the box is designed for basic tip-over prevention, not for a wall-to-wall installation loaded with books. Find studs with a stud finder and drive 3-inch screws through the back panel of each unit into solid framing. This is a safety issue: unsecured heavy bookcases can tip forward in apartments with active households.
Third, photograph your wall before you start. Take photos of every anchor point and every area of drywall you touch. When you move out, patch the screw holes with spackling paste, sand smooth, and touch up the paint. That is normal wear-and-tear repair in most lease agreements. The photos protect you if there is any disagreement about the original condition of the wall.
For more ways to maximize storage in a rental, see our guides to small apartment storage hacks under $50 and 35 small apartment storage hacks.
The Takeaway
The Billy bookcase built-in is one of the best investments you can make in a small rental apartment. For $200 to $500 in total materials, including units, crown molding, paint, and trim, you get a wall of floor-to-ceiling shelving that looks custom and adds genuine storage to a room that probably had none. The three steps that do the most work are closing the gap to the ceiling, painting everything the same color, and adding a continuous run of crown molding. Do those three things well and the rest is finishing work. The Billy disappears and the built-in appears in its place.
Related reading: 25 IKEA Hacks for Small Apartments | 12 IKEA Kallax Hacks for Small Apartments | 35 Small Apartment Storage Hacks